+ Reply to Thread
Page 1 of 3 123 LastLast
Results 1 to 10 of 28

Thread: "Blackbird" 23' Billfisher

  1. #1
    Join Date
    Apr 2010
    Location
    Long Beach
    Posts
    48

    Default "Blackbird" 23' Billfisher

    Hello All,

    My name is Jay. Been cruising around the board for awhile and Mike just got me dialed in. Thanks Mike! Look forward to hangin' around.

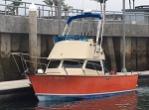
    Picked up "Secret Spot", a 1983 23' Billfisher from Larry back in November and have spent my few spare minutes each week doing some clean up work. Nothing major yet, still putting plans together and didnt want to tear too much up right before the season. Decided to change her name to "Blackbird". Larry lives just around the corner from me and names all of his boats "Secret Spot". I couln't have the neighbors thinking he owns every boat up and down the block. Really, the name just kinda came to me as I've been working on her. I'll be sure to have the proper re-naming ceremonies upon first launch. Also, I found while working over the gelcoat her first name was "Mi Amigo". Just wondering if anybody had any old pics or know any history.

    Started a thread on B.D. a while back asking for tips to remove the epoxy bottom coat that needed help. I'll post some of the shots from the thread and continue with the rest of my progress here as I go.

    This is what it looked like:


    I tried the Back to Nature paint remover with no results. I left it on waaay longer than I should have and it didnt do a thing. Next, I tried the Interlux 299E marine paint stripper. After 8 hours the gel coat looked like it was beginning to tack up and the epoxy didnt budge.


    More pics to follow

  2. #2
    Join Date
    Apr 2004
    Location
    Spring Valley
    Posts
    2,692

    Default

    Welcome aboard Jay. It's nice to have another 23' owner on the board.

    Mike
    NoSlack-------------------------------------------<'(((>{

  3. #3
    Join Date
    Apr 2010
    Location
    Long Beach
    Posts
    48

    Default

    Figured out I was going to have to sand off the epoxy. First off I pulled all the through hull fittings, brackets, and trim tabs. Most came easy, but the bait tank drain on the transom would not budge. After more time than I will admit f-ing with it, I took a diegrinder and punch to it and had it off in 5 minutes.


    I spent mucho time researching sand paper and found the right one. 3M makes good stuff and along with the 3 gazillion other things, they make these:


    3M calls them Clean Sanding Discs for Composite Finishing 360L. They work! I went with P500 for the epoxy and P1000 to knock down the scratches on the entire hull. Picked up a new Bosch 5" DA sander with the hook and loop pad. This sander comes with an attachment to hook up a vacuum and it plugged into the Shop Vac just right. This system works good. I wore a mask when sanding but you could get by without one. It is that clean. The pads dont load up fast either.

    Working from left to right, here is the epoxy coming off:


    Followed up sanding with Marikate On/Off hull cleaner to take off the staining.

  4. #4
    Join Date
    Apr 2010
    Location
    Long Beach
    Posts
    48

    Default

    Thanks for the Welcome Mike. I'll have to check out No Slack one of these days. Larry tells me you keep her in top shape. I'm sure I could learn a thing or two from you.

    Here are a couple more pics of the progress.

    The next shot is with the P1000 done. Some of the shine is starting to come back. Blue tape where the gelcoat needed to be filled. The deep scratches and a few dings that went through to the glass were v'd out, filled with gelcoat, then covered with wax paper to smooth. When cured P1000 again.


    Most of the work from here I tried to do at night. The work lights with 100W bulbs set at an angle catch everything and show what needs to be worked over.


    After it was smooth, 3M Super Duty Compound on a Wool Pad at low speed took out the fine scratches followed by 3M Finesse It II on a finish foam pad at high speed brought the shine back.


    Its better than it used to be:


  5. #5
    Join Date
    Apr 2010
    Location
    Long Beach
    Posts
    48

    Default

    Time to put the stripes back on. Working with the lights at night, I could just make out the ghost image of the old stripes. Made pencil marks about every 6" for a guide. Went with Cal-Stripes 3 part stripe tape from Jamestown Dist. This tape has a paper backer, thick stripe material, then a thin clear cover film. After the tape is down and the bubbles out, the cover film strips off. First a 1/2" line went on. Then a second 1/2" line right next to it. Then the 2" line below that. Went back and pulled the 1/2" line in the middle off to leave an even white stripe.


    One side down, one to go!

  6. #6
    Join Date
    Apr 2010
    Location
    Long Beach
    Posts
    48

    Default

    My window frames leak like a big dog everytime it rains. Even the dew finds it way through. The caulking is weathered and the paint that was applied to the frames had seen better days. I wanted to reseal, but not till fresh paint could be put down.

    First was to remove the caulking and old paint. A razor blade and a couple different removers made quick work of it. I made a trip to harbor freight and picked up a gravity feed spot blaster, on sale of course. This is the one:

    - Harbor Freight Tools - Quality Tools at the Lowest Prices

    Next stop, Home depot for 3 50# bags of 30 grit sand. 3 bags turned out to be just right. If I had to do it again, I would buy one of the blasters with a canister and feed tube. Had to refill waaay to many times, but I thought the old paint would come off easier. Some of the hard spots I soaked with Jasco to lift it. When dry, it blasted right off.

    Before:


    Start sand blast:


    Done with sand blast, removed all the tape. Blew out windows really good to remove all sand and re-taped. Ready for paint:


    For paint, I went with Matthews Acrylic Polyurethane. A Painter friend of mine recommended it for weather / sun and for sticking to the aluminum. Put some on a beer can without any primer and a day later I could not scratch it off, this stuff is nails. Here is more info:

    https://corporateportal.ppg.com/NR/r...MPC102SMAP.pdf

    It uses a special primer that bites into the aluminum and the top coat bites into it. Tried reducing it down to spray through an airbrush, but I could not get it to go well. Ended up pulling out an old mini spray gun that was collecting dust. This gravity feed gun worked like magic:


  7. #7
    Join Date
    Apr 2010
    Location
    Long Beach
    Posts
    48

    Default

    Primer going on. Layed down 2 coats of primer 20 min. apart:


    Top coat going on. Layed down 3 coats 20 min. apart:


    Couldnt resist painting some mean looking eyes on it:


    It came out o.k. for outside spray work. Couple dingle balls here and there. Will squeeze in some Black 3M 5200 next weekend. Should look better when the windows are tinted.

    After:


  8. #8
    Join Date
    Apr 2010
    Location
    Long Beach
    Posts
    48

    Default

    That wraps up the last few months of weekends. I just finished the port side this past weekend and pulled the stripes. Here is where I am now.


    Uploaded with ImageShack.us

    My next plans are to change out the bait tank. Already pulled the stock tank and have a Offshore 65 oval to put in. Might be a couple more weeks for that.

    See ya, J

  9. #9
    Join Date
    Apr 2004
    Location
    Spring Valley
    Posts
    2,692

    Default

    Can I get your address? I'd like to drop the boat off for a quick makeover.

    You're doing miracles on that 27 year old hull.

    Mike
    NoSlack-------------------------------------------<'(((>{

  10. #10
    Join Date
    Mar 2007
    Location
    Anza, Ca
    Posts
    181

    Default

    Welcome to BOCA Jay. WOW the boat turned out killer. That makes my arms sore just looking at the pictures. I have done many custom paint jobs on various things (cars, motorcycles, fishing rods, gaffs, etc.) and I know how much buffing sucks. I know it is too late now but if there is a next time try following the 1000 with 1500 then 2500 and then if your wallet can take it 3000. I know the sand paper is pricey but believe me it makes the job go a lot faster and your arms will thank you.

    Pat

+ Reply to Thread

Thread Information

Users Browsing this Thread

There are currently 1 users browsing this thread. (0 members and 1 guests)


Posting Permissions

  • You may not post new threads
  • You may not post replies
  • You may not post attachments
  • You may not edit your posts